Asset Sections
Path: Assets > View All
Go to Assets > View All and edit a record. On the edited record, you can see additional sections at the bottom of the record. These are visible after you have created and saved a new record. Look for the following sections::
Select this Section to review when and to whom an Asset has been assigned or allocated.
The Life Cycle Section displays costs, salvage value, depreciation, inflation, and history. Use the Download Insured History button to review. If you have entered the needed dates and inflation rate, the Yearly Capital Plan button is enabled as well.
The Parts Section is used to add any Parts affiliated with the Asset. If no Parts have been selected, you can click in the blank area beneath the Parts Section label and select from a drop-down list.
Meters only apply to Assets and can be used to track usage by any measurement you specify such as miles, gallons, hours, or any other kind of meter you use. See About Asset Metering, Metering Type and Manage Metering for more information about meters.
The Set Trigger button is used to establish PMs based on meters.
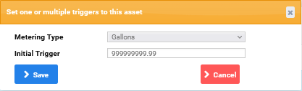
Use the Set Trigger button to choose the Metering Type and Initial Trigger value. From that point on, Eagle CMMS will generate a PM work order when the Trigger value is met.
Open this section to see any documents or images that were selected when the record was created. Files are added using the Files field in the topmost Section. Attachments can be deleted from the Attachments Section. Files are added using the Files field in the topmost Section
Attachments can be deleted from the Attachments Section. Move your cursor over the selected icon and select Delete when it pops up.
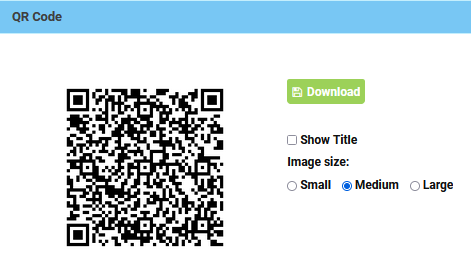
QR Codes are automatically generated when you create a record. Choose title and size options, then click the green Download button to produce the QR code in an image file you can attach to the item or location.
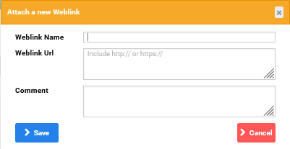
Use the Add Weblink button to open the Attach a new Weblink popup and enter a link for a web site related to the item. To make changes to an existing Weblink, click the green line edit button.
Asset Downtime is assigned from the Work Order > List View window.
When a Work Order includes an Asset in the Assets field, Eagle CMMS displays a clock  icon at the far right of the Work Order List View
 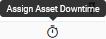 .
.
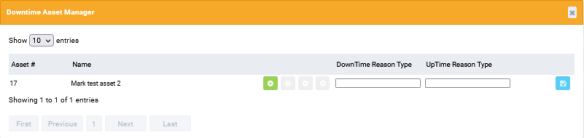
To mark an Asset as Down, click the icon and complete the Downtime Asset Manager popup.
-
Click the green
 Start Downtime button.
 -
Enter the optional DownTime Reason Type.
-
Click the
 Save button.
When you refresh the Work Order View All window, the clock face icon is now black with a strike-through line  .
.
The Asset > View All window also displays a clock face icon at the far right of the window with a tool tip that reads "Asset Currently Down".
Your entries are reflected in the Asset Downtime Section of the Asset record and in the Assets Currently Down field of the Work Order.
To stop Downtime, click the clock face icon on either the Asset > View All or the Work Order > List View window to re-open the Downtime Asset Manager popup and select the  Stop Downtime button.